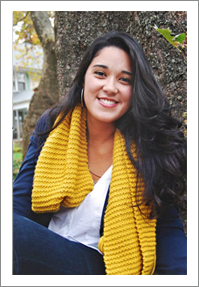


Today I’m going to share with you a quick tip that I’ve been using on all my fall photos this season. Who doesn’t love all the beautiful colors this time of year? However, sometimes I find that my camera doesn’t capture them as I’d like – this is were Photoshop comes to save the day. I’m a big believer of getting things as close to perfect in camera before relying on editing, but I don’t mind taking artistic liberties in Photoshop when necessary. This picture was taken with the sun behind them and a giant white reflector in front to bounce light back on their faces. Why not a natural reflector in this scenario? There was nothing but grass in front of them and I wanted to avoid having a green color cast on their faces. I also made sure to adjust my white balance in camera to “Shade” for more accurate colors. The picture below is the final product after little adjustments to contrast, brightness and sharpening in post processing.

Even though I love the picture itself, I wanted to add a little more drama and make the colors look more fall-ish, if possible. To do that I went into my “Hue/Saturation” adjustment panel, selected the Yellow channel (not the Master) from the drop down menu. I then decreased my Hue from 0 to -20 for a more dramatic effect. Normally, I would only go to -10, but I wanted the change to be a little more dramatic for this tutorial. From there, I go over my subjects and the grass with the black brush to remove the hue adjustment I just made. Even though I want my leaves to look a little warmer than the original, I still want my subject’s skin to maintain it’s natural tone and my grass to remain green. Below is the same shot but with that hue adjustment. Do you notice the difference? It’s undeniably fall in this scene!

For those that prefer video tutorials, I played around and made one for this quick lesson. If there’s a high demand, I’ll see if I make more of these in the future, although my production skills leave much to be desired!

Life with Kaishon - Thank you for this great little tutorial! You are the best. I really need to get a reflector, but then I will need to find a helper for every shoot, and believe it or not, those are hard to come by in my neck of the woods! Darn it.
: ) Happy Monday.
Elly - Haha, such a fun tutorial – the background music was pretty fun :)
Maddy {Mad Hearts Photography} - You should definitely consider getting one! I don’t have an assistant either,so I’ll hold it one hand and shoot with the other. Or just prop it up against something if I can. It’s definitely worth it – even a white poster board would do :)
Maddy {Mad Hearts Photography} - Lol! Ah yes, the music! I was looking for something royalty-free and that’s the best I could find :) thanks for checking out the video!
Sarah - Great tutorial, thank you for sharing!
Amy - Oh, what a great tutorial–love it! Thank you!