


I’m going to share with you my little secret for skin retouching in Photoshop that doesn’t involve Gaussian blur, special actions or expensive products. It’s a little tool that already comes within Photoshop CS5 and it works wonders. It’s called the Mixer Brush. It’s used to recreate the look of a painting within Photoshop, but I like to use it for skin retouching at a low opacity. Unlike the Gaussian Blur (which just adds a layer of blur over the picture), the Mixer Brush actually samples from the existing colors around it as you work so the effect is subtle and true to life. Let’s demonstrate exactly how this tool works:

- This is a picture I took from Charlotte’s glamour session. As you can see, her skin is pretty clear, but can benefit from a little smoothing.

- The Mixer Brush is found embedded under the Brush Tool menu. At the top of my menu bar, I make sure to select the “Moist ,Heavy Mix” option from the drop down and change my settings as indicated above. As a general rule, I clone out any larger blemishes before I start working with the Mixer Brush. I also create a new layer so I can do my edits on the new layer and not the original photo.

- I can start painting over the areas I want to smoothened with the Mixer Brush on a new layer. For this example, I painted pretty much all the exposed skin, carefully skipping over her hair, mouth, eyes, eyebrows and lashes. You want to avoid these areas to preserve the details. I also did a little smoothing under her eyes. I never completely patch/clone out under eye circles because I like to keep things as realistic as possible. However, I will smoothened the lines with the mixer brush or dodge them a bit so that they are not as prominent. Though the Mixer Brush smoothing effect is very subtle, I still like to lower my layer opacity a bit to keep my edit looking as natural as possible and to allow a bit of original skin texture to show through.
![]()
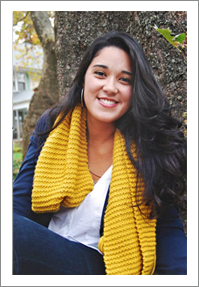
Voila – the finished product! I can’t recommend the Mixer Brush enough when it comes to skin retouching. It’s fast, easy and in my opinion, yields some of the most natural results I’ve seen. I’ve tried other tools within Photoshop, spent tons of money on other skin retouching products, but I always go back to this method. I love the results and it has become an essential part of my workflow.
![]()

Charisma Moran - Great tutorial! Thanks for sharing!
Scarlett - thanks for sharing your little secret Maddy! i really like this natural look : )
Adrion - Thanks for posting this! I’ve been wondering how you used the mixer brush for your edits! I am excited to try it out!
mindy - ahhh, I love little secrets like this. I wonder if CS4 has a mixer brush, or if I will have to upgrade…
Camila Faria - Maddy, you’re a Photoshop wizard! Love everything you do!
Maddy {Mad Hearts Photography} - I think it was just introduced in CS5. But if you’re already considering an upgrade, it’s definitely worth it!
Hannah - I love this! So going to give this a try for retouching! Thanks for a peek behind your editing curtain! ;)
Katherine Vargas - I’m newbie to the whole skin retouching and this help tons thanks a lot for sharing your way of doing it.
Amy - Ooh, lovely! I need to get over my fear of layers. One mention of the word, and I’m done . . . :)
elle sees - i need photoshop after seeing this!! so natural!!!