


Ever see a picture where the sunlight peeks behind the subject giving off a beautiful halo effect? It’s called backlighting. It’s an easy way to add visual interest without the need for fancy equipment. All you need is a light source behind your subject, light flowing behind the camera too (so no obstructions like walls or tree) and to switch your camera setting to spot metering. It’s usually best to try this in the early morning or evening when the light is simply yummy (like these photos), but you can also try it midday like I did for this example. Let’s start with my initial picture:

This was a photo taken during my “In The Heights” session on the George Washington Bridge. Given the time of day (11am) ,it was impossible to get a decent shot from this angle (with a view of the bridge) because the the sunlight (coming from the side) was overpowering a large part of her face and casting a shadow on the other. So I chucked that idea and decided to try some backlighting shots instead. I had Kiara turn with her back to the sun and I positioned myself slightly in front. I got this shot.

There’s no longer a large highlight or shadow over her face and you can start seeing the sunlight peek through her hairline, so we’re half way there. However, the problem with this photo is that I forgot to change the meter setting on my camera. It was set to “matrix metering” (on Nikons // aka multi-zone metering), which means that the camera took into account all the light in the frame to expose this shot – including the overpowering sunlight behind Kiara – and that’s why this photo came out way too dark.
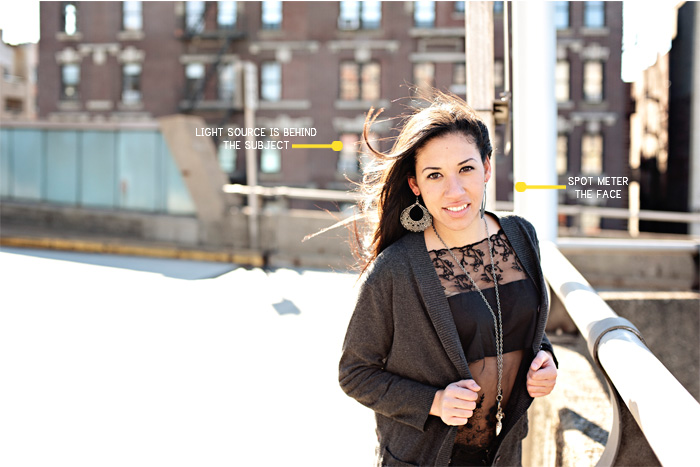
After realizing my mistake, I switched to spot metering. This way the camera only takes into account the small area of the shot that I want to properly expose – her face. As you can see, some areas of the photos are now a bit overexposed (the pavement, the sky, the metal railing), but more importantly, my subject is now properly exposed. Add a sexy gust of wind and presto! Ok, gust of wind is not required, but it definitely adds to the drama. Not bad for a midday shot!
![]()

Hannah - It’s always so fun to see and hear about others’ process when it comes to getting the right shot. Thanks for sharing!
Donna - This makes SO much sense! I swear photography books can be so dense sometimes.. maybe you should start a new column ;)
Emily - Talent, that’s what it’s called. You are so talented lady. Truth be told I have had a DSLR for several years but I really don’t mess around with it much. Thinking it might be time to figure out all it can really do.
Maddy {Mad Hearts Photography} - So glad you found it helpful, Donna! My {What I Learned…} post are exactly that – simple tips for those interested in learning about photography. I’m hoping to post more tutorials and quick tips in the near future!
The Guilty Hyena - Always a joy to learn something new everyday. I know I don’t make the most of my DSLR, I find it less cumbersome to carry a compact digital camera around, which gives me less opportunities to experiment with the DSLR.
Amy - Oh, thanks Maddy–you know I need all the help I can get when it comes to taking photos! :)
Sarah - Dodeline Design - What amazing tips! I need all the help I can get and this one is definitely a keeper!
lou - gosh.. there is so much to learn when it comes to photography. your tips are so super helpful and the last photo turned out awesome. i always try to experiment with halos when i catch some though i never got a decent picture from it. need to practice more!
Maddy {Mad Hearts Photography} - It does take a bit of practice, but once you get the hang of it, it’s so simple! You can still get the effect without the use of dslr or spot metering. Just make sure to position your subject right in front of the light source and that there’s enough light hitting their face too (you can use reflectors or even flash as fill light). If the face happens to still be a bit on the dark side, you can always brighten it up in Photoshop afterwards (though I try to nail it in camera to cut down my editing time).
Life with Kaishon - Such a great lesson : ) Thanks for taking the time to post this. She is gorgeous!
Sabine - Great explanations and beautiful photos, Maddy! A diffuser would come in handy – but since I don’t have one I normally just overexpose against the sun.
Nadette@Eat, Read, Rant! - This is a great refresher lesson, I’ve struggled with metering in the some of my outdoor photos, and it doesn’t help that my starter canon camera has very basic metering options. I want to do some silhouette photos, but I’ll have to reconsult my notes on how exactly to do that, but I know backlighting is invovled. Great photos!
Maddy {Mad Hearts Photography} - Silhouettes are the same concept, but instead of metering your subject, you meter the sky or light source. When you do that, everything else will be darker, except the sky. That’s how silhouettes are done :) You may have to go into photoshop to enhance the effect, but that’s practically it – very easy!
Jo - This is wonderful!! Thank you for the tutorial!!
A dear friend of mine just got new headshots, and we were discussing how her new photographer used backlighting. I’m telling you, her headshots are the best I’ve seen! It makes me wonder why more headshot photographers don’t use this technique!!
Cafe Fashionista - I seriously love these pictures – and the advice for taking them. Photography is far more complicated than I ever imagined; but when you see the results it’s definitely worth it! :)
Maja - Wow, what amazing photographs on your blog!
Thank you for your sweet comment.
Camila Faria - WOW, Maddy, you’re such a pro! Thanks for all your amazing tips!
Elle sees - If I ever get a fancy camera, I’m hitting you up for tips!
yummychunklet - Great photos!
Tiera - Yes, more awesome tips! PS: What lens are you using in these photos? Thanks girl :)
Maddy {Mad Hearts Photography} - That would be the nifty fifty (50mm f/1.4) – I rarely take a picture without it :)
Jacky {The Sweetest Petunia} - These pictures are so gorgeous! :)